Setup Bot
You will need Node installed on your laptop. If you don’t, go to the Node website to download and install it.Once you are done, you can continue with the setup for the bot. Follow the steps below:
1. Launch Terminal. or Command Prompt (windows)
2. You need a separate directory for holding your code.
- Make a new directory
mkdir testbot
- Change your working directory to the directory you just created
cd testbot
npm init- You will be asked to enter information about your application, just use the defaults by pressing Enter for everything.

4. Install packages
npm install express body-parser request --save- The command will run, and give some warnings; ignore them.

Open the directory “testbot” that you created, and find the file named “package.json“; open this in an editor like Sublime Text. You can use default text editors like gedit or notepad
6. In this file, we need to add a line at line 8.
"start": "node index.js"- Don’t forget to append a “,” at the end of the previous line.

7. Next, create a new file in Sublime Text, and put in the following code inside it:
var express = require('express');var bodyParser = require('body-parser');var request = require('request');var app = express();app.use(bodyParser.urlencoded({extended: false}));app.use(bodyParser.json());app.listen((process.env.PORT || 3000));app.get('/', function (req, res) {res.send('This is TestBot Server');});app.get('/webhook', function (req, res) {if (req.query['hub.verify_token'] === 'testbot_verify_token') {res.send(req.query['hub.challenge']);} else {res.send('Invalid verify token');}});
Save this file as index.js
Note: In Line 13, the value of ‘hub.verify_token’ is set as ‘testbot_verify_token’, remember this value as it will be used when creating the webhook in Facebook.
Note: “git” is a version control system for files and software code. You can read more about it on Wikipedia.
Creating a git repository is easy, and only takes a couple of Terminal commands.
Note: Make sure you are inside the “testbot” directory in the Terminal. You can do this by typing the command
Follow these steps to create a git repository:
1.
2.
3.

4. Now you can push your app code to Heroku
5. Once this is done, your app is basically live, and you can visit the link in your browser to check that everything is working fine. It should open a webpage saying “This is TestBot Server“.
1. Go to Facebook and create a new page.
3. Next, head over to the Facebook Developers’ Website.
4. Fill up the details for your App Name and contact email address.
5. You will be taken to the dashboard for your app. On the sidebar, navigate to “+Add Products” and select “Messenger” by clicking on the “Get Started” button.
6. Select “Setup Webhooks“.
7. Fill up the required fields, replacing the “Callback URL” with the URL of the Heroku app, Verify Token with the token used in the index.js file, and select the following Subscription Fields:
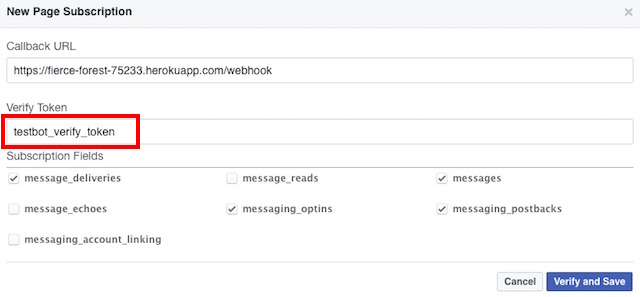
Note: Make sure you append “/webhook” to the Callback URL so that index.js executes the required function when Facebook tries to ping the URL, it can verify the “Verify Token”.
8. Click on “Verify and Save“.
9. In the “Token Generation” section, click on “Select a Page” and select the page you created earlier.
This will generate a “Page Access Token“, save it somewhere; you will need it later.
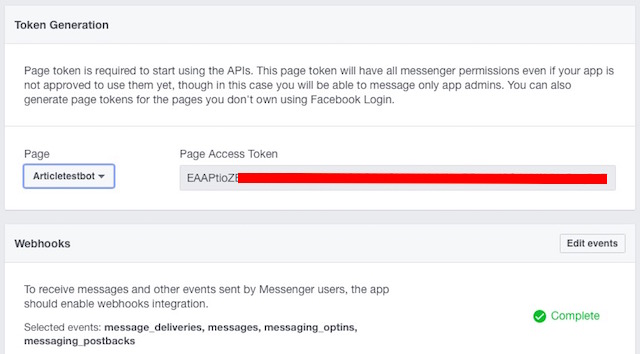
10. Next, you will have to make a POST query to your app, using the Page Access Token generated in the last step. This can be easily done in the Terminal. Just run the following command, replacing PAGE_ACCESS_TOKEN with the Page Access Token you generated.
curl -X POST “https://graph.facebook.com/v2.6/me/subscribed_apps?access_token=PAGE_ACCESS_TOKEN”
You should receive a “success” response in the Terminal.
1. Go to the Heroku website and log in with your email ID.
2. Locate your app in the “dashboard” and click on it.
3. Navigate to the Settings tab.
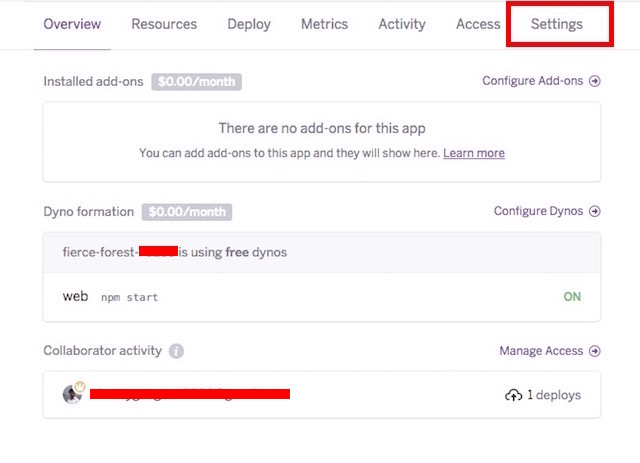
4. Click on “Reveal Config Vars”

5. Add the PAGE_ACCESS_TOKEN as a “config var“, and click “Add“.


In the index.js file, add the following code:
What this function does, is it checks for received messages, and then checks if there is text in the message. If it finds text in the received message, it calls the sendMessage (shown later) function, passing the sender’s ID and the text to send back. It’s important to understand the following values and what they mean:
The “sendMessage” function takes two parameters:
The message is the actual text that is to be sent in the response.
1. Launch Terminal.
2. Change directory to your testbot directory
cd testbot
3. Do the following steps:
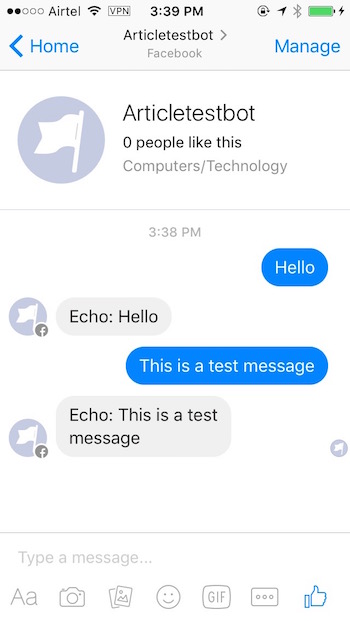
To achieve this, we need to add another function. I’m naming it “conditionalResponses”, but you can choose whatever name you prefer.
In lines 4 to 7, we have defined variables depending on matching the received string against particular words. The best part about using “text.match()” is that it uses Regular Expressions (usually called regex, read more here.). It is good for us, because this means that as long as even a part of a word in the received text matches with either of the words we mentioned in text.match(), the variable will not be null. This means, that if the received message was “What’s pizza?”, “var what” and “var pizza” will not be null, because the word “What’s” contains the word “what”. So we are saved from creating extra statements for every variation in which someone might say “What”.
The changes in the listener might not look very drastic, but their effects sure are. Now, the listener first tries to respond with conditional responses, and if there is no valid condition for the received message, it simply echoes the message back to the user.
1. Launch Terminal.
2. Change directory to your testbot directory
cd testbot
3. Do the following steps:
Have you ever developed a Facebook messenger bot? If you have, how did you go about developing it, and what can it do? Did you use services like Wit.ai and Api.ai to create your bot? If you haven’t ever tried your hands on coding a bot, go and develop your own Facebook messenger bot, make it smarter and better, and let us know about your experience in the comments below.
Note: In Line 13, the value of ‘hub.verify_token’ is set as ‘testbot_verify_token’, remember this value as it will be used when creating the webhook in Facebook.
Create Git Repository
Now that we have set up our bot’s callback handling, we need to push the code to Heroku. For that, we need to create a git repository in our directory.Note: “git” is a version control system for files and software code. You can read more about it on Wikipedia.
Creating a git repository is easy, and only takes a couple of Terminal commands.
Note: Make sure you are inside the “testbot” directory in the Terminal. You can do this by typing the command
pwd into the Terminal.Follow these steps to create a git repository:
1.
git init2.
git add .3.
git commit -m "Register Facebook Webhook"
4. Now you can push your app code to Heroku
git push heroku master5. Once this is done, your app is basically live, and you can visit the link in your browser to check that everything is working fine. It should open a webpage saying “This is TestBot Server“.
Facebook Setup
It’s time to connect our bot to Facebook! You will need to create a new Facebook Page or use an existing one that you own. I’ll show you how to proceed by creating a new Facebook Page.1. Go to Facebook and create a new page.
- You can create a page in whichever category you want. I’m opting for Company/Organisation, for no particular reason.
3. Next, head over to the Facebook Developers’ Website.
- On the top-right, hover your mouse on “My Apps” and then click on “Add a New App” from the drop-down menu.
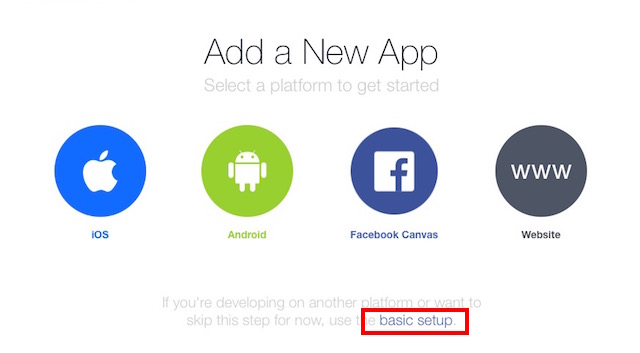
- Click on “basic setup” when Facebook prompts you to choose a platform.

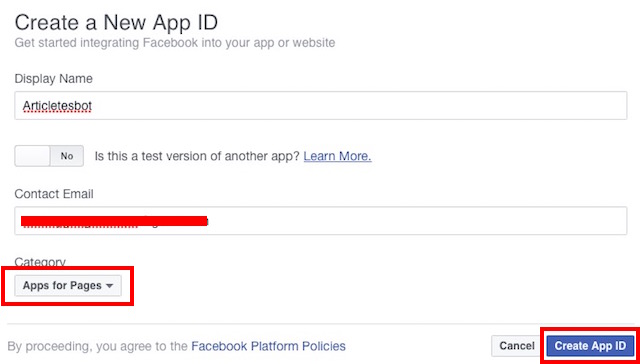
4. Fill up the details for your App Name and contact email address.
- Select “Apps for Pages” in the Category.
- Click on “Create App ID“.

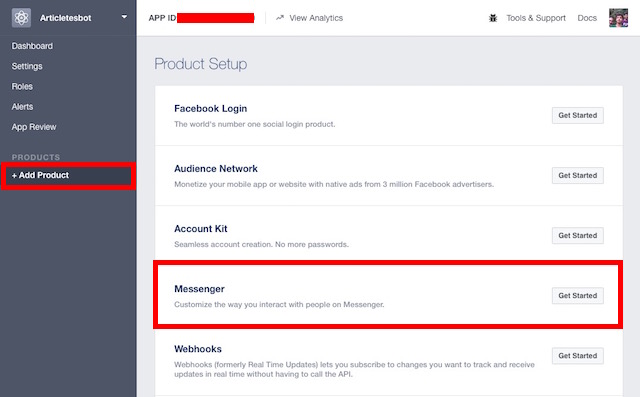
5. You will be taken to the dashboard for your app. On the sidebar, navigate to “+Add Products” and select “Messenger” by clicking on the “Get Started” button.

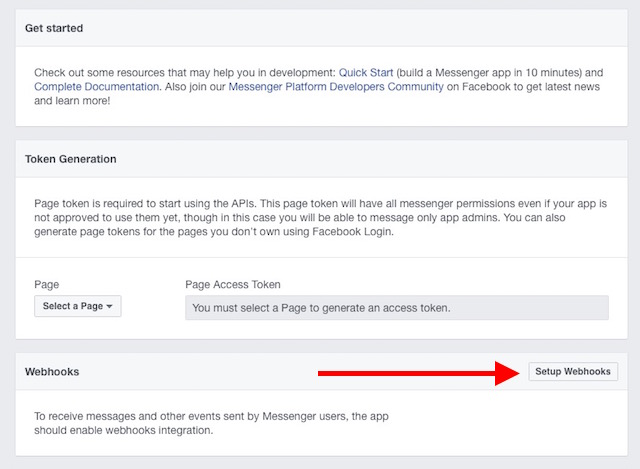
6. Select “Setup Webhooks“.

7. Fill up the required fields, replacing the “Callback URL” with the URL of the Heroku app, Verify Token with the token used in the index.js file, and select the following Subscription Fields:
- message_deliveries
- messages
- message_optins
- messaging_postbacks

Note: Make sure you append “/webhook” to the Callback URL so that index.js executes the required function when Facebook tries to ping the URL, it can verify the “Verify Token”.
8. Click on “Verify and Save“.
9. In the “Token Generation” section, click on “Select a Page” and select the page you created earlier.
This will generate a “Page Access Token“, save it somewhere; you will need it later.

10. Next, you will have to make a POST query to your app, using the Page Access Token generated in the last step. This can be easily done in the Terminal. Just run the following command, replacing PAGE_ACCESS_TOKEN with the Page Access Token you generated.
curl -X POST “https://graph.facebook.com/v2.6/me/subscribed_apps?access_token=PAGE_ACCESS_TOKEN”
You should receive a “success” response in the Terminal.
More Heroku Setup
Yeah, we’re not done, yet. Not nearly.1. Go to the Heroku website and log in with your email ID.
2. Locate your app in the “dashboard” and click on it.
3. Navigate to the Settings tab.

4. Click on “Reveal Config Vars”

5. Add the PAGE_ACCESS_TOKEN as a “config var“, and click “Add“.


Coding the Actual Bot
Now that we’re done with the grunt work, we can focus on what really matters: making the bot respond to messages. To start off, we’ll just design a bot that simply echoes the messages it receives. As it turns out, this simple task requires a considerable bit of code to function.1. Coding the Message Listener
Before the bot can echo back the message, it needs to be able to listen for messages. Let’s do that first.In the index.js file, add the following code:
app.post('/webhook', function (req, res) {var events = req.body.entry[0].messaging;for (i = 0; i < events.length; i++) {var event = events[i];if (event.message && event.message.text) {sendMessage(event.sender.id, {text: "Echo: " + event.message.text});}}res.sendStatus(200);}); |
- event.message.text is the text received in the message. For example, if someone sends the message “Hello” to our bot, the value of event.message.text will be “Hello”.
- event.sender.id is the id of the person who sent the message to the bot. This is required so that the bot knows whom to address the response to.
2. Coding the sendMessage Function
Lets code the “sendMessage” function, now.
1
2
3
4
5
6
7
8
9
10
11
12
13
14
15
16
17
|
function sendMessage(recipientId, message) {request({url: 'https://graph.facebook.com/v2.6/me/messages',qs: {access_token: process.env.PAGE_ACCESS_TOKEN},method: 'POST',json: {recipient: {id: recipientId},message: message,}}, function(error, response, body) {if (error) {console.log('Error sending message: ', error);} else if (response.body.error) {console.log('Error: ', response.body.error);}});}; |
- recipientId
- message
The message is the actual text that is to be sent in the response.
3. Pushing the Changes to Heroku
If you have completed the steps above, your bot should be able to echo back the received text. But first, you have to push the changes to the application hosted on Heroku. To do this, follow the steps given below:1. Launch Terminal.
2. Change directory to your testbot directory
cd testbot
3. Do the following steps:
- git add .
- Note: There is a “.” at the end of “git add”
- git commit -m “First commit”
- git push heroku master

Conditional Responses aka Making the Bot Smarter (Bonus Code) – skip, if you want to.
We can use text matching to allow our Facebook messenger bot to respond according to certain special keywords.To achieve this, we need to add another function. I’m naming it “conditionalResponses”, but you can choose whatever name you prefer.
1. Coding the conditionalResponses Function
1
2
3
4
5
6
7
8
9
10
11
12
13
14
15
16
17
18
19
20
21
22
23
24
25
26
27
28
29
30
|
function conditionalResponses(recipientId, text) {text = text || "";var what = text.match(/what/gi); //check if text string contains the word "what"; ignore casevar pizza = text.match(/pizza/gi); //check if text string contains the word "pizza"; ignore casevar who = text.match(/who/gi); //check if text string contains the word "who"; ignore casevar you = text.match(/you/gi); //check if text string contains the word "you"; ignore case//if text contains both "what" and "pizza", do this:if(what != null &&; Pizza != null) {message = {text: "Pizza is a thing which satisfies hunger"}sendMessage(recipientId, message);return true;}//if text contains both "who" and "you", do this:if(who != null && you != null) {message = {text: "I have been asked not to discuss my identity online."}sendMessage(recipientId, message);return true;}//if nothing matched, return false to continue execution of inner function.return false;}; |
2. Editing the Message Listener
We also need to edit the Message Listener we coded, to ensure that it tries to match the received text with the “conditionalResponses” function as well.
1
2
3
4
5
6
7
8
9
10
11
12
13
14
15
16
|
app.post('/webhook', function (req, res) {var events = req.body.entry[0].messaging;for (i = 0; i < events.length; i++) {var event = events[i];if (event.message && event.message.text) {//first try to check whether received message qualifies for conditional response.if(!conditionalResponses(event.sender.id, event.message.text)) {//if it doesn't, simply echo the received message back to the sender.sendMessage(event.sender.id, {text: "Echo: " + event.message.text});}}}res.sendStatus(200);}); |
3. Pushing the Changes to Heroku
Before you can try out the new features, you will have to push the updated code to the app hosted on Heroku. Follow the steps below to do this:1. Launch Terminal.
2. Change directory to your testbot directory
cd testbot
3. Do the following steps:
- git add .
- Note: There is a “.” at the end of “git add”
- git commit -m “Adding conditional capabilities”
- git push heroku master
Dig Deeper
Now that you know how to get started with developing Facebook messenger bots, go through the Facebook documentation on how to develop Facebook messenger bots. While the documentation is not good for beginners, you’re not a beginner anymore. You should check out the official documentation and try to figure out how to make your bot even smarter. Teaser: You can send messages with images and buttons as well! It’s also possible to use services such as Wit.ai and Api.ai to code your bot and then integrate it with Facebook, but in my feeble attempts to use those services, Wit.ai doesn’t work too well, and Api.ai has a sharp learning curve for beginners.Have you ever developed a Facebook messenger bot? If you have, how did you go about developing it, and what can it do? Did you use services like Wit.ai and Api.ai to create your bot? If you haven’t ever tried your hands on coding a bot, go and develop your own Facebook messenger bot, make it smarter and better, and let us know about your experience in the comments below.


0 komentar:
Posting Komentar